Our first repo
Overview
Teaching: 30 min
Exercises: 30 minQuestions
What is a repository?
How does Git operate?
How do I make commits?
How do I select what to commit?
Objectives
Learn to create Git repositories and make commits.
Get a grasp of the structure of a repository.
Learn how to inspect the project history.
Learn how to write useful commit log messages.
Tracking a guacamole recipe with Git
We will learn how to initialize a Git repository, how to track changes, and how to make delicious guacamole!
This example is inspired by Byron Smith, for original reference, see this thread. The motivation for taking a cooking recipe instead of a program is that everybody can relate to cooking but not everybody may be able to relate to a program written in e.g. Python or another language.
Let’s start.
One of the basic principles of Git is that it is easy to create repositories:
To do this within RStudio, create an empty New Project within a New Directory and ensure that “Create a git repository” is selected.
That’s it! We have now created a new RStudio Project with it’s own Git repository.
If we look at the file pane to show the directory’s contents, it appears that not much has happened:

The two files created (.gitignore and intro-git.Rproj) are both created by RStudio to help us manage
the project.
But if we select “Show Hidden Files” from the “More” menu, we can see that Git has created a hidden directory
within the directory called .git:
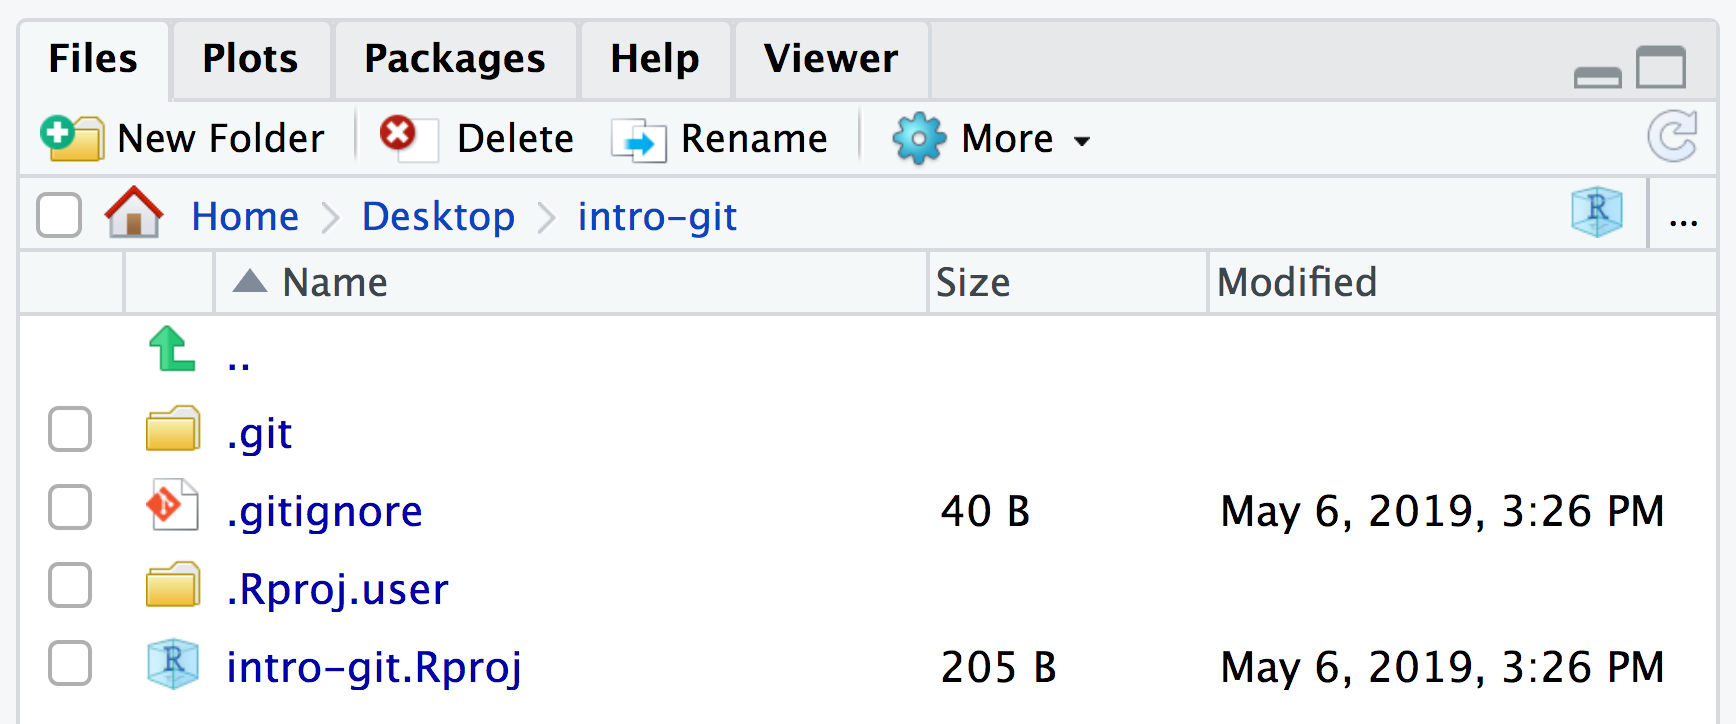
Git uses this special sub-directory to store all the information about the project, including all files and sub-directories located within the project’s directory. If we ever delete the .git sub-directory, we will lose the project’s history.
To check out to see what is going on with the repository, you can view the Git status pane:
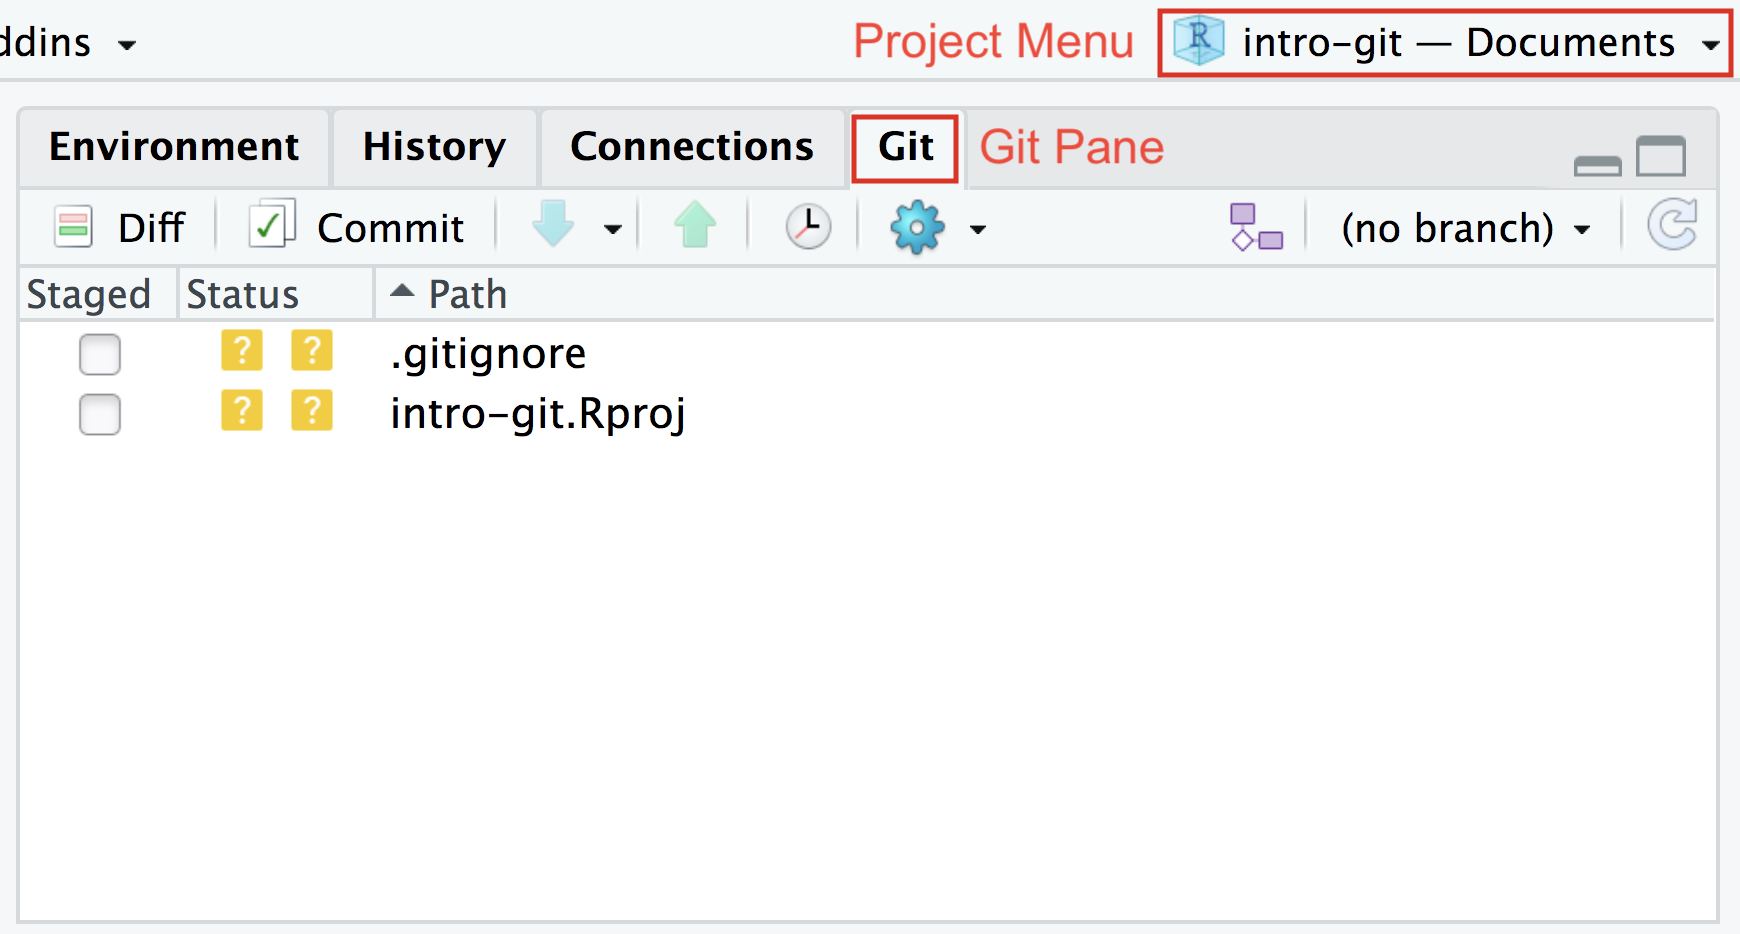
The [?] by each file in this case shows that the two created files are currently untracked by Git. We will make sense of the information in the Git pane during this lesson.
So what exactly is a Git repository?
- Remember Git is a version control system: it records snapshots and tracks the content of a folder as it changes over time.
- Every time we commit a snapshot, Git records a snapshot of the entire project, saves it, and assigns it a version.
- These snapshots are kept inside the
.gitsub-folder. - If we remove
.git, we remove the repository and history (but keep the working directory!). .gituses relative paths - you can move the whole thing somewhere else and it will still work- Git doesn’t do anything unless you ask it to (it does not record anything automatically).
Recording a snapshot with Git
- Git takes snapshots only if we request it.
-
We will record changes always in two steps (we will later explain why this is a recommended practice):
- We first focus (
git add, we “stage” the change), then shoot (git commit):
Discussion
What do you think will be the outcome if you stage a file and then edit it and stage it again, do this several times and at the end perform a commit? (think of focusing several scenes and pressing the shoot button only at the end)
So that’s the concept - let’s do it for real.
Let’s create two files.
One file is called instructions.txt and contains:
* chop avocados
* chop onion
* squeeze lime
* add salt
* and mix well
The second file is called ingredients.txt and contains:
* 2 avocados
* 1 lime
* 2 tsp salt
Challenge 1
Create the two files with “File”>”New File”>”Text File”.
Copy the contents above into the files and save them
What is the status of these files in the Git pane?
Solution 1
The two files are both listed as untracked
As mentioned above, in RStudio you can always check the Git status of files in your repository using the Git pane.

In this case, the files are both listed as untracked because we have not yet told Git to pay attention
to them. Going back to the photography analogy, we need to add the files (focus the camera)
to the list of files tracked by Git. Git does not track any files automatically and you need make a
conscious decision to add a file.
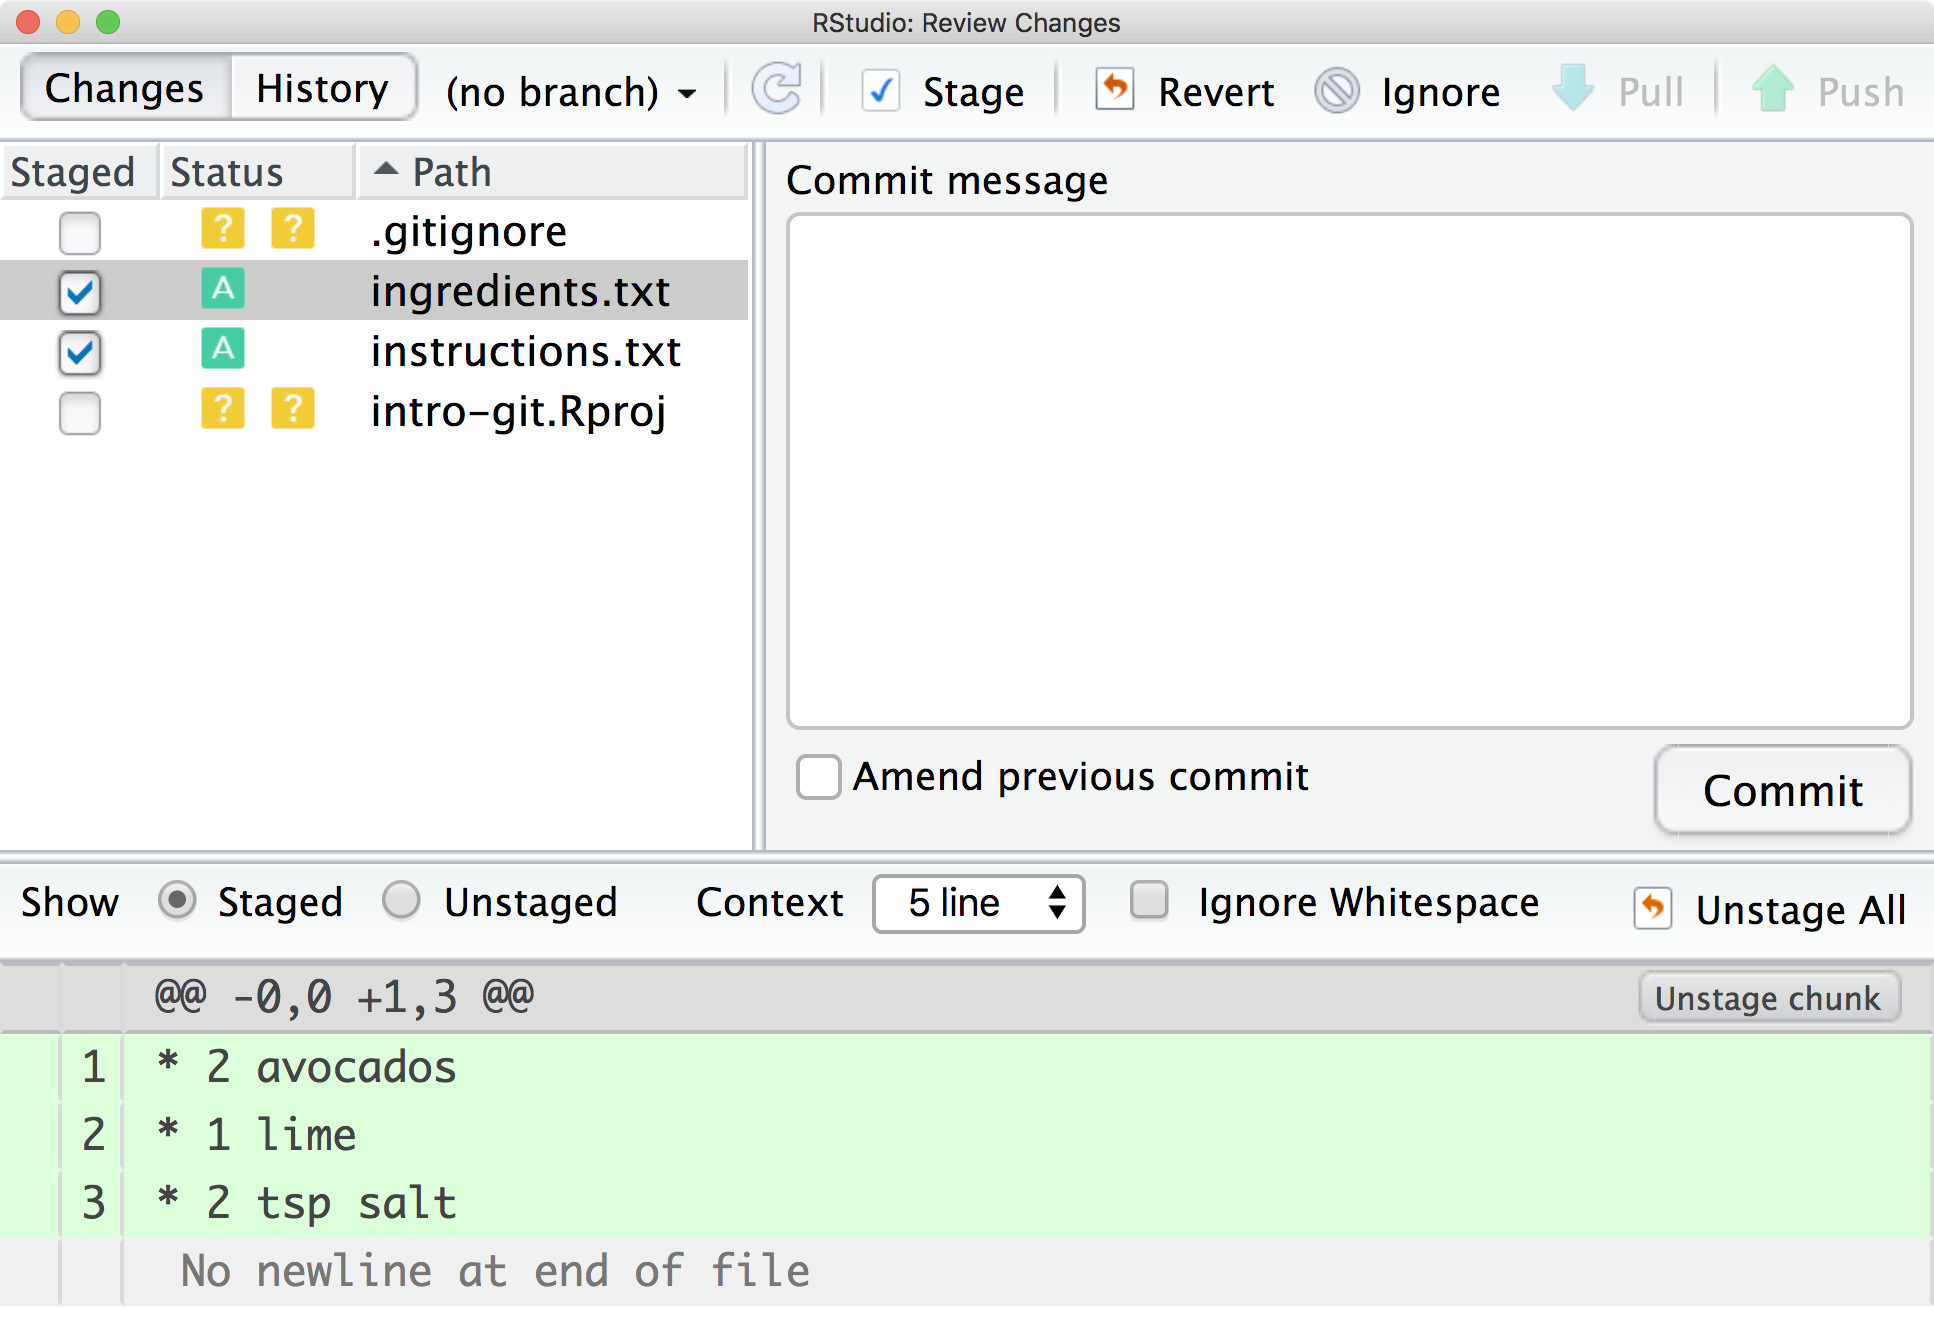
To stage the new files (add them to the repository), simply select the “Staged” checkbox beside the files.

The status symbol for these two files has changed to [A]dded to show that these files have been added to the staging area for the first time.
Why two status columns?
The two columns of status symbols help you determine where the changes are. The status for the left hand column is for the staging area, and for the right hand column for the working directory.
Now this change is staged and ready to be committed (the camera is focused and we’re ready to take the snapshot).
Let’s now commit the change to the repository using the “Commit” button
 .
This brings up a window where we can double check our proposed commit and confirm it with a message
explaining what we have done.
Challenge 2
After exploring the commit window to see what it shows, confirm the commit with the commit message
adding ingredients and instructionsWhat is the response you recieve?
Solution to Challenge 2
You will recieve a message explaining what Git has done. It will include your commit message and a summary of the files and lines of text that have been changed.
If you look at the Git status pane after your commit, you will see that ingredients.txt and instructions.txt
are no longer listed. This means that there are no differences between your working files, staging area,
and Git repository. Everything is up to date.
Looking at the history
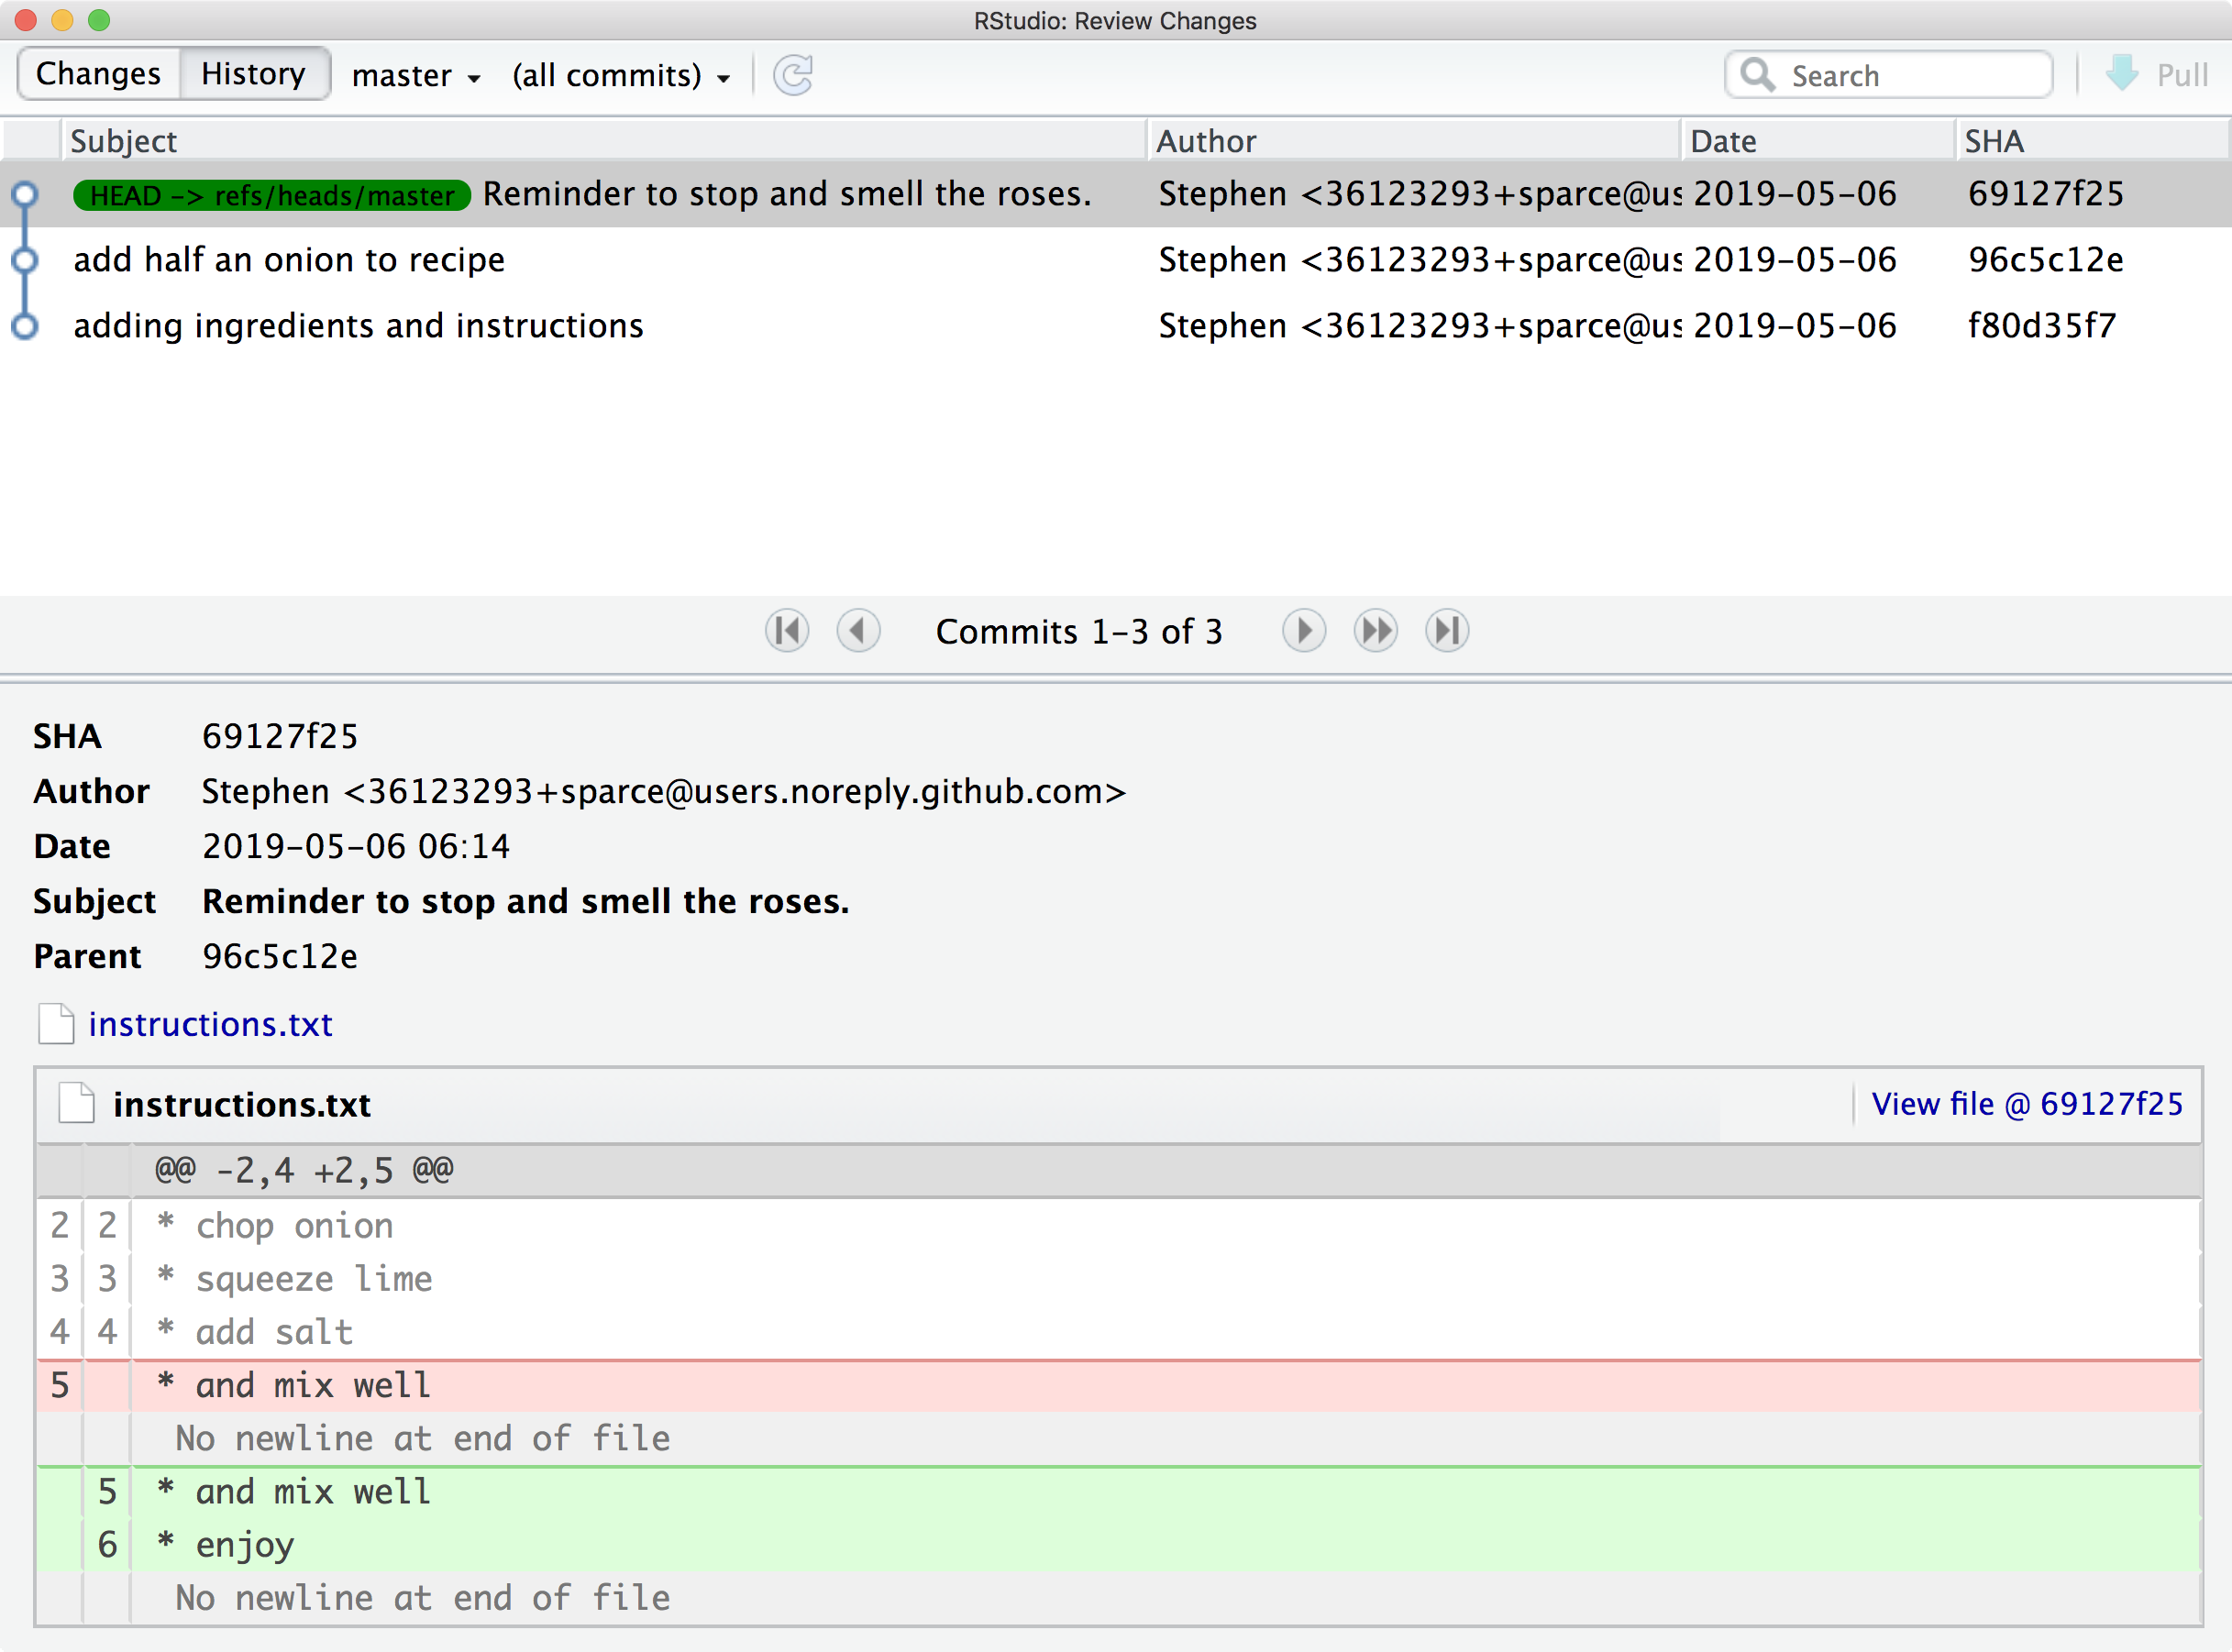
To track the progression of your repository, you can use the “History” window
 :
:
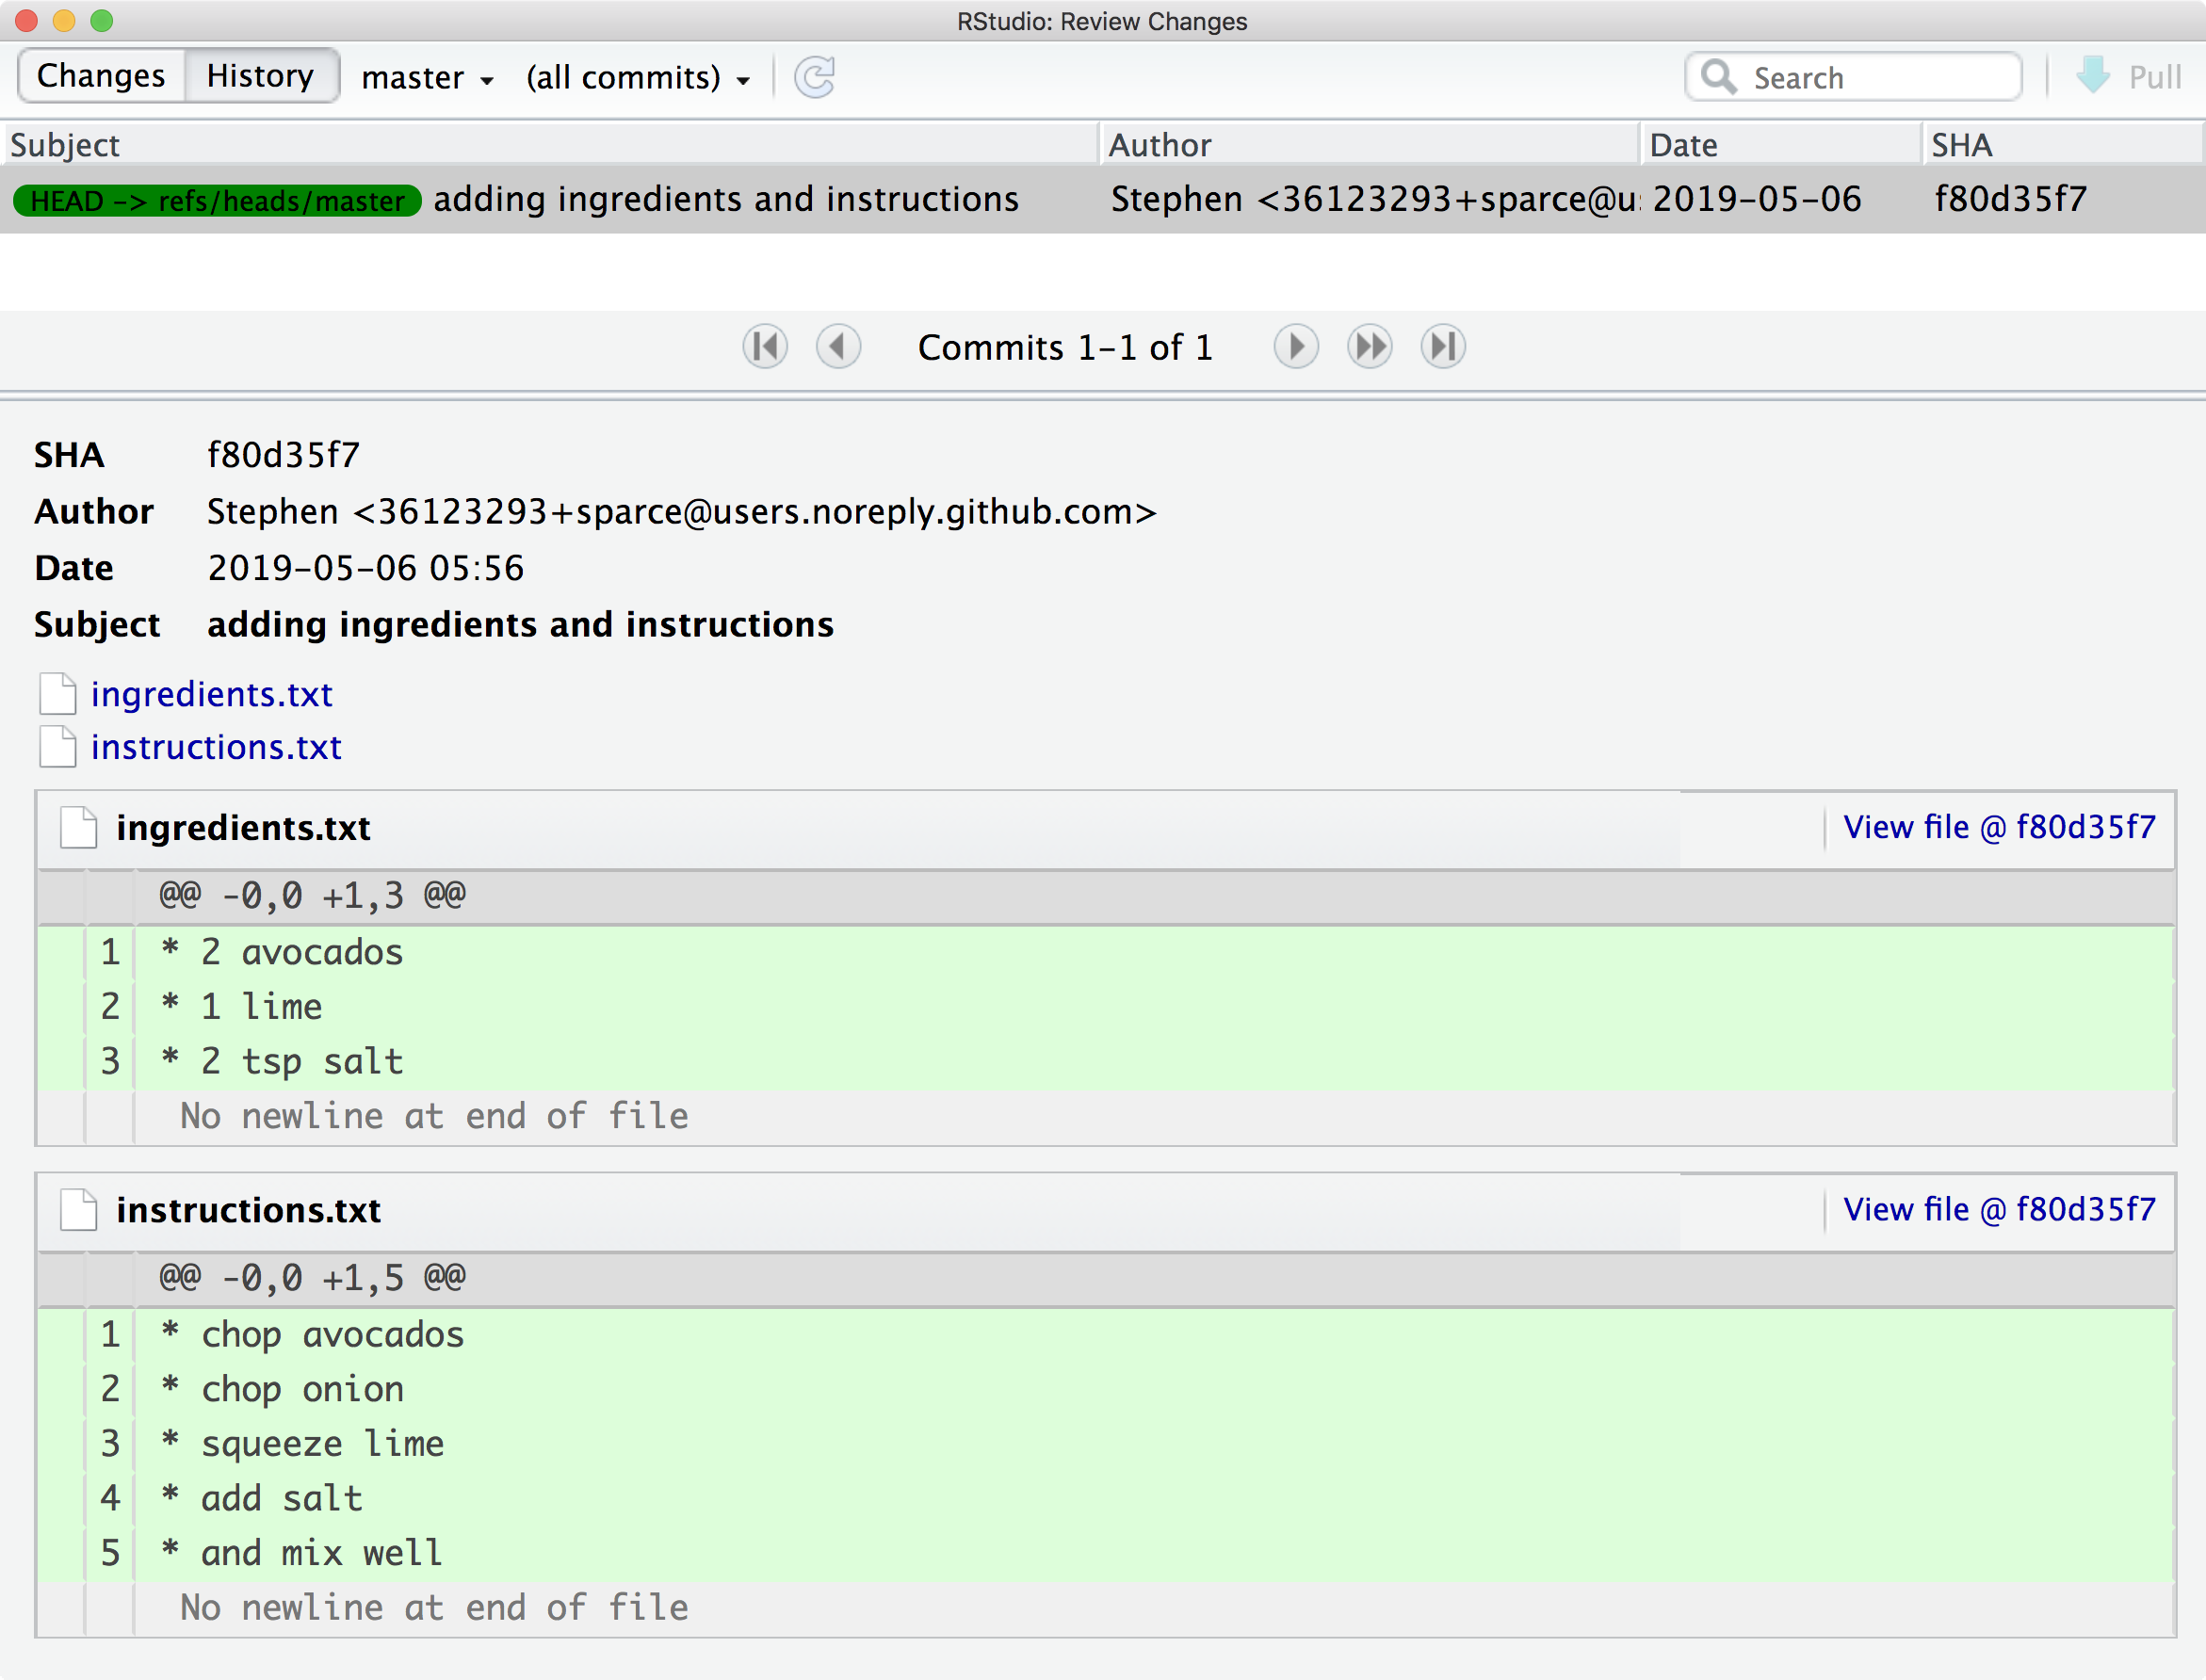
From this window, we can browse the development and access each state that we have committed no matter how long ago it was.
Challenge 3
Add 1/2 onion to
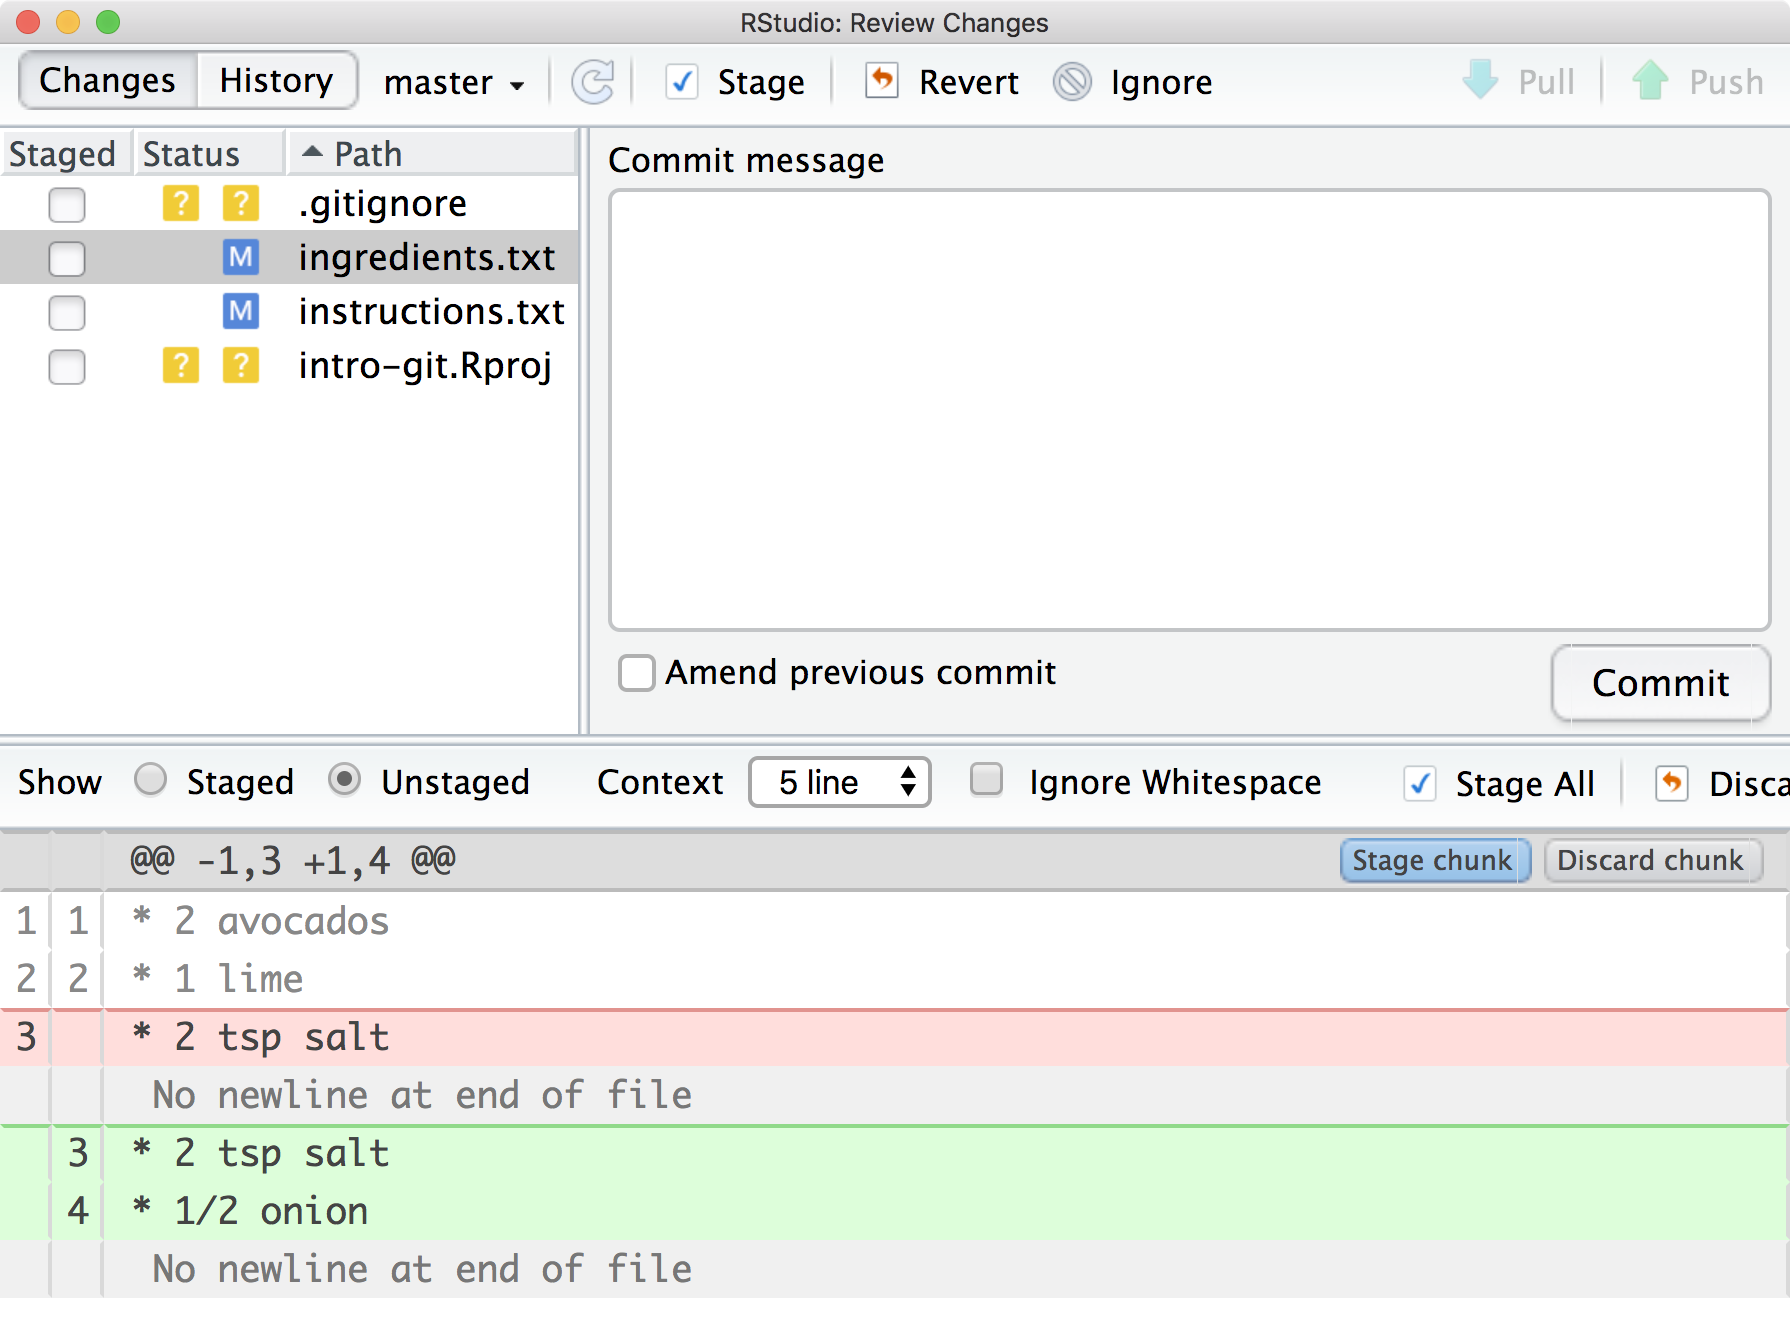
ingredients.txtand also the instruction to “enjoy!” toinstructions.txt. Save the changes but do not stage them yet.What is their new status? Hint: Hover over the status symbol if you do not know what it means.
When you are done editing the files, check the differences between their current state and their last committed state with the “Diff” window
What does the output tell you?
Solution to Challenge 3
The status of the files change to [M]odified. Because the status is in the right hand column it is telling us that the files in our working directory are different from the last commit, but that these changes have not been staged yet.
- The output lets you review any differences between a file and it’s last committed version
- Added lines are shown in green while deleted lines are shown in red.
Challenge 4
Stage and commit each change separately. For the first commit, use a one line commit message. For the second commit, use a long message that has multiple lines.
What do you see in the Git History after you have committed both changes?
Solution to Challenge 4
A possible solution:
The commit message in this case was:
Reminder to stop and smell the roses.
It's important to tell people to enjoy it in the instructions because otherwise they might forget.
And we are very keen for people to enjoy this recipe.
but only the first line is shown. The full message is saved with the commit however, and can be accessed using the command line tools.
Writing useful commit messages
From the last example we understand that the first line of the commit message is very important.
Good example:
increase threshold alpha to 2.0

the motivation for this change is
to enable ...
...
Convention: one line summarizing the commit, then one empty line, then paragraph(s) with more details in free form, if necessary.
- Bad commit messages: “fix”, “oops”, “save work”, “foobar”, “toto”, “qppjdfjd”, “”.
- For your amusement: http://whatthecommit.com
- Write commit messages in English that will be understood 15 years from now by someone else than you.
Ignoring files and paths with .gitignore
Some files should not be tracked in a Git repository. This includes files that are:
- specific to a particular computer
- contain sensitive information
- large, binary files
- compiled files
Discussion
What could be the problems raised by committing the above files to a repo?
For this we use .gitignore files that tell Git to ignore certain files. For example, the contents
of the .gitignore file created when we started the project:
.Rproj.user
.Rhistory
.RData
.Ruserdata
This tells Git to ignore any files that match those names in the same folder as the .gitignore file.
These are all files that RStudio might create while you are working but contain data that most people
do not want to save permanently in a repository.
Challenge 5
Make a new file called
my-personal-notes.txt. Add some content to the file that describes your feelings about Git so far… What happens in the Git Status pane when you save the file?Since you might not want these comments seen by collaborators, make sure it is ignored by git by adding the file path to
.gitignore. What happens in the Git Status pane after you save the.gitignorechange?Solution to Challenge 3
The file
my-personal-notes.txtshould appear in the Git Status pane as untracked when you change it for the first time.When you add it to
.gitignoreit will no longer appear in the Git Status pane.
You can have .gitignore files in lower level directories and they affect the paths
relatively.
.gitignore should be part of the repository (why?).
Keep your repo clean
- Check the Git Status pane often.
- Use
.gitignore. - If you don’t want to track a file, it should be listed in .gitignore.
- All files should be either tracked or ignored.
Summary
Now we know how to save snapshots by staging and then committing them.
And this is the most common use pattern for Git as you work. Write some text/code, stage and commit it your changes at a reasonable point. Then start again writing your code from the new checkpoint.
Key Points
Initializing a Git repository is simple:
git initCommits should be used to tell a story.
Git uses the .git folder to store the snapshots.


